1) JAVA IntelliJ IDEA Community
Downloads
No matter the size of your company, Azul offers competitive pricing options to fit your needs, your budget, and your ambition.
www.azul.com
- 탐색기 > 내 PC 마우스 우클릭 > 속성을 클릭합니다.
- 좌측 메뉴 최하단의 "고급 시스템 설정"을 클릭합니다.

- "환경 변수"를 클릭합니다.

- 하단 <시스템 변수> 영역의 "새로 만들기"를 클릭합니다.

- 변수 이름을 JAVA_HOME, 값을 아래와 같이 입력합니다.
- C:\\Program Files\\Zulu\\zulu-8
- 마찬가지로 <시스템 변수> 영역의 "Path"를 찾고 "편집"을 클릭합니다. 제일 끝에 아래 내용을 입력합니다.
- ;C:\\Program Files\\Zulu\\zulu-8\\bin
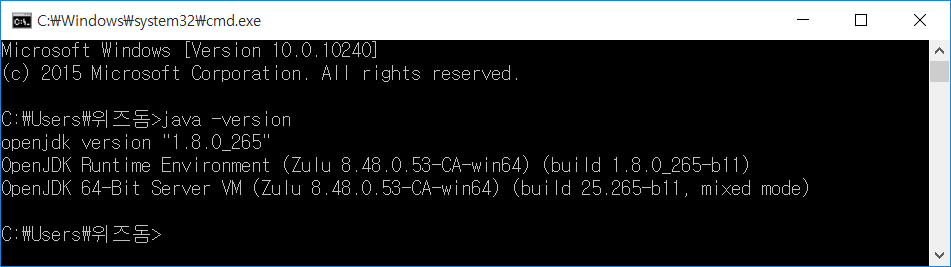
- '확인'을 누르고 빠져나온 뒤, 윈도우키 + R 을 누르고 cmd 입력 후 엔터를 누릅니다.
- 아래 내용을 입력했을 때 캡처와 같이 OpenJDK 관련 정보가 표시되면 설치 완료입니다.
- 탐색기 > 내 PC 마우스 우클릭 > 속성을 클릭합니다.
- 좌측 메뉴 최하단의 "고급 시스템 설정"을 클릭합니다.
- "환경 변수"를 클릭합니다.
- 하단 <시스템 변수> 영역의 "새로 만들기"를 클릭합니다.
- 변수 이름을 JAVA_HOME, 값을 아래와 같이 입력합니다.
- C:\\Program Files\\Zulu\\zulu-8
- 마찬가지로 <시스템 변수> 영역의 "Path"를 찾고 "편집"을 클릭합니다. 제일 끝에 아래 내용을 입력합니다.
- ;C:\\Program Files\\Zulu\\zulu-8\\bin
- '확인'을 누르고 빠져나온 뒤, 윈도우키 + R 을 누르고 cmd 입력 후 엔터를 누릅니다.
- 아래 내용을 입력했을 때 캡처와 같이 OpenJDK 관련 정보가 표시되면 설치 완료입니다.
2) IntelliJ IDEA Community 프로그램 설치
https://www.jetbrains.com/idea/download/#section=windows
Download IntelliJ IDEA: The Capable & Ergonomic Java IDE by JetBrains
Download the latest version of IntelliJ IDEA for Windows, macOS or Linux.
www.jetbrains.com
3) graddle https://gradle.org/releases/
Gradle | Releases
Find binaries and reference documentation for current and past versions of Gradle.
gradle.org
현재 날짜/ 시간(now)
LocalDate date = LocalDate.now();
LocalTime time = LocalTime.now();
LocalDateTime datetime = LocalDateTime.now();
2022-11-28
15:40:06.240486400
2022-11-28T15:40:06.241482200
특정날짜, 시간
LocalDate dateOf = LocalDate.of(2022, 11, 28);
LocalTime timeOf = LocalTime.of(15, 50, 0);
2022-11-28
15:50
시간형식
DateTimeFormatter formatter = DateTimeFormatter.ofLocalizedTime(FormatStyle.SHORT);
String shortFormat = formatter.format(LocalTime.now());
15:50
public enum FormatStyle {
    // ordered from large to small

    /**
     * Full text style, with the most detail.
     * For example, the format might be 'Tuesday, April 12, 1952 AD' or '3:30:42pm PST'.
     */
    FULL,
    /**
     * Long text style, with lots of detail.
     * For example, the format might be 'January 12, 1952'.
     */
    LONG,
    /**
     * Medium text style, with some detail.
     * For example, the format might be 'Jan 12, 1952'.
     */
    MEDIUM,
    /**
     * Short text style, typically numeric.
     * For example, the format might be '12.13.52' or '3:30pm'.
     */
    SHORT;

}
내가 원하는 패턴으로 날짜,시간형식 지정
DateTimeFormatter myformatter = DateTimeFormatter.ofPattern("yyyy-MM-dd");
String myDate = myformatter.format(LocalDate.now());
2022-11-28
년, 월, 일 시간 차이 계산
LocalDate today = LocalDate.now();
LocalDate birthday = LocalDate.of(1993, 2, 6);
Period period = Period.between(today, birthday);
System.out.println(period.getMonths());
System.out.println(period.getDays());
System.out.println(period.getYears());
-9
-22
-29
리스트
List<Integer> integerList = new ArrayList<>();
integerList.add(1);
integerList.add(5);
integerList.add(3);
integerList.add(2);
integerList.add(0);

Collections.sort(integerList);
System.out.println(integerList);
// 리스트 안의 자료를 오름차순 정렬해준다
integerList.remove(4);
//4번쨰 요소를 제거해준다

for (int integer : integerList) {
    System.out.println(integer);
}
Set (데이터의 중복을 허용하지 않음)
순서가 유지되지 않는다
Set<Integer> integerSet = new HashSet<>();
// 컬렉션을 쓰기 위해서는 객체를 담을 수 있는 타입이어야 함(참조형 자료만 사용 가능)

integerSet.add(1);
integerSet.add(1);
integerSet.add(3);
integerSet.add(2);
integerSet.add(9);
integerSet.add(9);
integerSet.add(8);

integerSet.remove(9);
//순서가 없으므로 지울 객체를 직접 지정해준다

List<Integer> target = new ArrayList<>();
target.add(1);
target.add(3);

integerSet.removeAll(target);
//removeAll은 컬렉션 타입을 넣어줘야 한다

System.out.println(integerSet.contains(3));
//특정 값이 있는지 확인해봄

System.out.println(integerSet.size());
integerSet.clear(); // 모두 지우기
Map(key, value)
Map<Integer, String> map = new HashMap<>();
map.put(1, "apple");
map.put(2, "berry");
map.put(3, "cherry");
map.put(4, "banana");
// 추가는 add가 아닌 put으로 해준다

System.out.println(map.get(1));
//첫번쨰 값 가져오기 -> 인덱스가 아닌 key의 값을 넣어줌

map.remove(2);
//특정 key 지우기

System.out.println(map.containsKey(2));
System.out.println(map.containsValue("banana"));
//키 값 또는 value값 포함되어 있는지 검색할 수 있음

map.clear(); //모두지우기
스택 - First In Last Out
Stack<Integer> stack = new Stack<>();
stack.push(1);
stack.push(3);
stack.push(5);
stack.push(7);

//마지막에 넣은 한개를 확인만 한다(지우지는 않음)
System.out.println(stack.peek());
System.out.println(stack);

//마지막에 넣은 값을 확인하며 삭제한다
System.out.println(stack.pop());
System.out.println(stack);

System.out.println(stack.contains(1));

System.out.println(stack.empty());
System.out.println(stack.isEmpty());
//스택이 비어있으면 true 반환
큐 First In First Out
Queue<Integer> que = new LinkedList<>();
//Queue는 인터페이스이기 때문에 구현체중 하나인 LinkedList가 필요하다

que.add(1);
que.add(3);
que.add(5);
que.add(7);

System.out.println(que.peek());
System.out.println(que);
//stack의 peep과 같음

System.out.println(que.poll());
System.out.println(que);
//stack에서 pop 같이 하나를 빼내면서 리턴한다 (맨 앞의 값)
ArrayDeque
실무에서는 Stack이나 Queue 대신에 많이 사용한다
ArrayDeque<Integer> arrayDeque = new ArrayDeque<>();
arrayDeque.addFirst(1);
arrayDeque.addFirst(2);
arrayDeque.addFirst(3);
arrayDeque.addFirst(4);
//계속해서 앞에 밀어넣기 때문에 처음에 넣은것은 뒤로 밀려난다

arrayDeque.addLast(0);
//마지막에 추가한다

arrayDeque.offerFirst(10);
//addfirst랑 비슷한데 offer은 큐의 크기에 문제가 생길 때 false를 리턴한다
//addFirst는 exception이 나옴

arrayDeque.offerLast(-1);

arrayDeque.push(22);
//푸시는 앞에 들어간다 (스택의 기능)
System.out.println(arrayDeque.pop());
//pop은 맨 앞에 값을 뺴낸다

System.out.println(arrayDeque.peek()); //앞에 있는 것을 뽑아낸다
System.out.println(arrayDeque.peekLast()); //뒤에 있는 것을 뽑아낸다
제네릭스
다양한 타입의 객체들을 다루는 메소드나 컬렉션 클래스에 컴파일 시의 타입 체크를 해주는 기능을 의미합니다.
→ 객체의 타입을 컴파일 시에 체크하기 때문에 안정성이 높아집니다
제네릭스의 형식
public class 클래스명<T> {...}
public interface 인터페이스명<T> {...}
제네릭스를 활용한 예제
List<String> list = new ArrayList();
//리스트는 인터페이스 ArrayList는 구현체
Collection<String> collection = list;
//List보다 더 상위에 있는 Collection에 list를 할당
람다
함수를 좀더 쉽게 표현
 List<String> list = new ArrayList<>();
        list.add("korea");
        list.add("england");
        list.add("usa");
        list.add("canada");

        Stream<String> stream = list.stream(); //리스트를 스트림으로
        stream.map(str -> str.toUpperCase())
        // str이라는 변수를 하나 정해서 stream에서 하나씩 꺼내 toUpperCase
        // -> 화살표 뒤에는 실행할 함수를 써주면 됨
//              .forEach(it -> System.out.println(it))  //각각 하나하나마다 실행
                .forEach(System.out::println); //파라미터가 하나면 이렇게 간결하게 가능
스트림
하나의 데이터의 흐름(컬렉션을 이용하는 경우가 많음)
데이터소스를 변경하지 않음
예제1
List<String> list = new ArrayList<>();
list.add("서울");
list.add("제주");
list.add("부산");
list.add("서울");

System.out.println(list);

List<String> result = list.stream()
        .limit(2) //2개만 출력
        .collect(Collectors.toList()); //스트림처리된 것을 하나로 모아서 또 다른 리스트로 만듦
System.out.println(result);

System.out.println("list -> set 으로 변형");
Set<String> set = list.stream()
        .filter("서울"::equals)  //서울과 일치하는 것만 남김
        .collect(Collectors.toSet());    //set은 중복 불허
System.out.println(set);
예제2
String[] arr = {"SQL", "Java", "Python"};
Stream<String> stringStream = Arrays.stream(arr);
stringStream.forEach(System.out::println);
예제3
pair쓰기 위해 import
implementation 'org.apache.commons:commons-lang3:3.0'class Sale {
String fruitName;
int price;
float discount;
public Sale(String fruitName, int price, float discount) {
this.fruitName = fruitName;
this.price = price;
this.discount = discount;
}
}
public class Main {
public static void main(String[] args) {
List<Sale> sales = Arrays.asList(
new Sale("apple",5000,0.05f),
new Sale("orange",4000,0.2f),
new Sale("banana",7000,0f)
);
sales.stream()
.map(sale -> Pair.of(sale.fruitName, sale.price*(1-sale.discount))) //pair는 자료구조 표현하기 위한 것
.forEach(pair -> System.out.println(pair.getLeft() + " 실구매가는 " + pair.getRight()));
}
}
예제4
List<Integer> list = Arrays.asList(1, 2, 3, 4, 5, 6, 7, 8, 9, 10);
System.out.println(list.stream().reduce(10, Integer::sum));
//처음에 10으로 시작해서 list의 값을 하나씩 꺼내서 더해줌
퀴즈
List<String> names = Arrays.asList("김정우", "김호정", "이하늘", "이정희", "박정우", "박지현", "정우석", "이지수");

System.out.println(
        names.stream()
                .filter(name -> name.startsWith("이"))
                .filter(name -> name.endsWith("늘"))
                .count()
);
Retrofit 라이브러리 import
implementation 'com.squareup.retrofit2:retrofit:2.9.0'
implementation 'com.squareup.retrofit2:converter-gson:2.9.0'
implementation 'com.google.code.gson:gson:2.8.5'
RetrofitService.java
public interface RetrofitService {
    @GET("/api/users")
    //retrofit2의 @GET이 임포트됨
    Call<Object> getUsers(@Query("page") int page); //api/users/뒤에 쿼리 설정

}
RetrofitClient.java
public class RetrofitClient {
    private static final String BASE_URL = "http://reqres.in/";
    //사이트 주소

     public static RetrofitService getApi(){
         return getInstance().create(RetrofitService.class);
     }

     private static Retrofit getInstance(){
         Gson gson = new GsonBuilder().setLenient().create();
         //Gson은 Json을 다루는 라이브러리
         return new Retrofit.Builder().baseUrl(BASE_URL)
                 .addConverterFactory(GsonConverterFactory.create(gson))
                 .build();
     }

}
Main.java
public class Main {
    public static void main(String[] args) {
        Call<Object> result =RetrofitClient.getApi().getUsers(2);
        //getApi로 Service를 반환하고 거기서 getUsers 호출

        try{
            System.out.println(result.execute().body()); //escute를 해야 실제 요청이 들어감
        } catch (IOException e){
            System.out.println(e.getMessage());
        }
    }
}
'Java > 정리' 카테고리의 다른 글
| 5. JAVA 클래스 (0) | 2022.12.22 |
|---|---|
| sparta (0) | 2022.10.24 |